I use Safari as the default browser on my Mac since it’s better optimized for macOS and consumes less power. It also provides more functionality than other browsers. However, with these tweaks, I managed to get more out of Safari on my Mac.
1 Show Full URLs in the Address Bar
The default setting in Safari is to display only the website’s domain name in the address bar. This makes the address bar look clean and minimalistic. However, the downside of this setting is that you can’t tell your exact location when viewing other pages on a website besides the homepage.
I prefer knowing my exact location while browsing any website, so I’ve set Safari to display the full URL in the address bar. Here’s how:
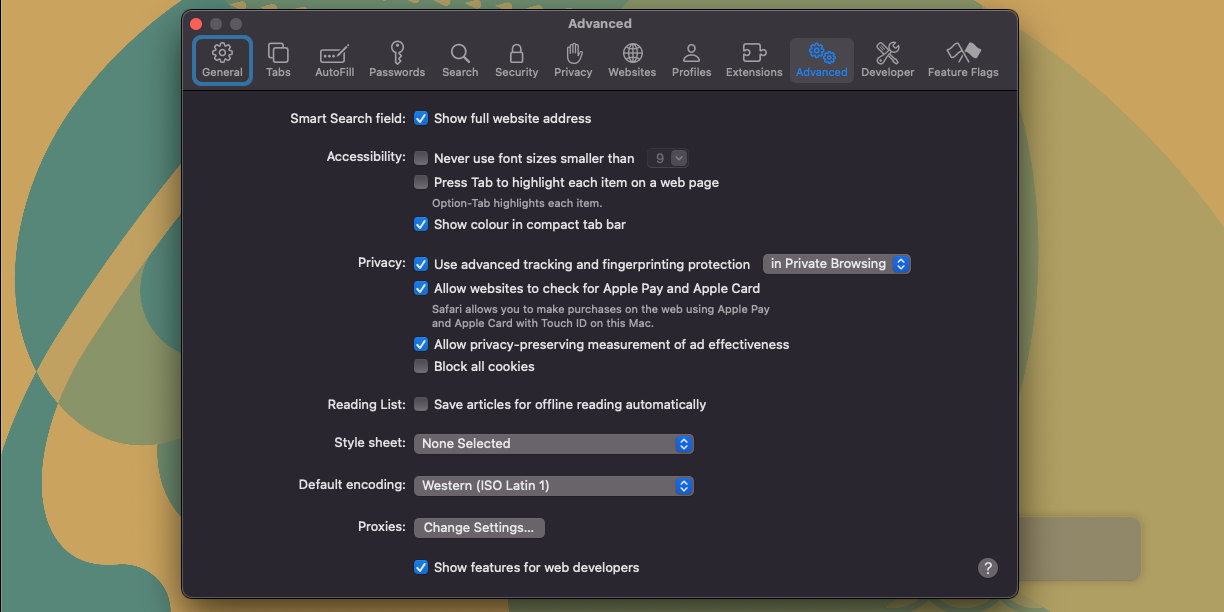
- Open Safari and click Safari in your Mac’s menu bar, then choose Settings.
- Select Advanced to open advanced settings.
- Next to Smart Search Field, select the Show full website address option.
Safari saves any changes automatically, immediately displaying complete URLs in the address bar.
2 Disable Auto-Play for Videos
One of the most annoying features on some websites is video auto-playback. You probably have experienced the same, too, when you visit a website and you hear a video automatically start playing on the website.
Thankfully, I’ve managed to prevent this issue by using Safari’s baked-in auto-play feature to block any website from automatically playing videos. Here’s how to do it:
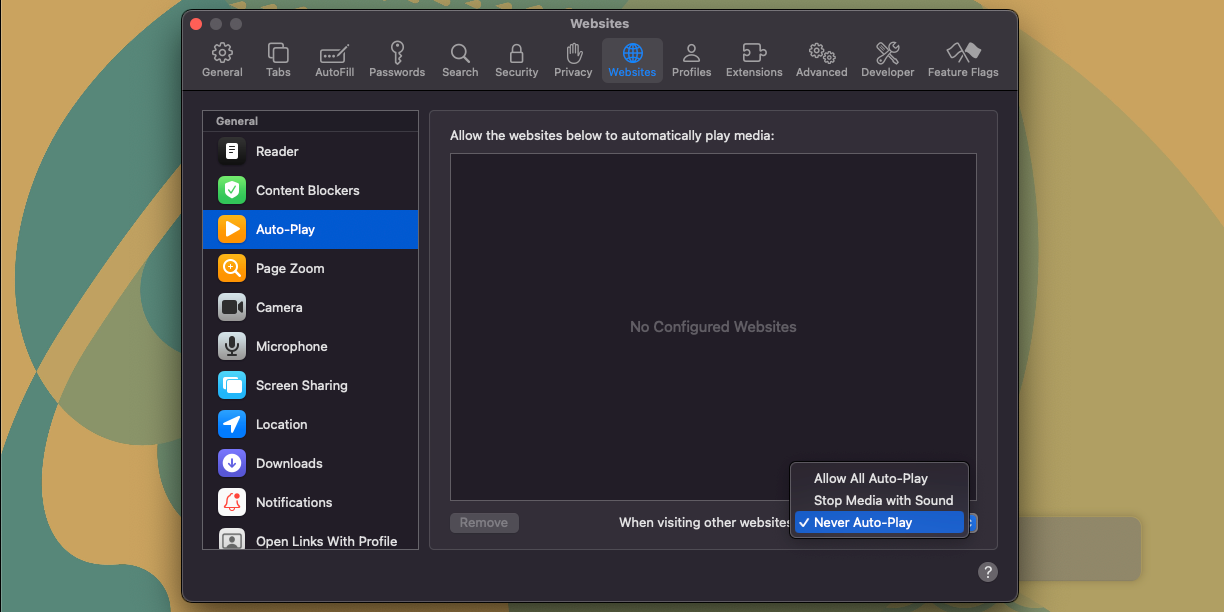
- Click Safari in the menu bar and select Settings.
- Click Websites to go to website settings.
- Under Websites, select Auto-Play.
- Click the option next to When visiting other websites and select Never Auto-Play.
In my experience, some websites (like Daily Mail) still manage to bypass this preference and will auto-play videos without sound. However, I’ve managed to address this issue by enabling another feature called Reader View.
3 Enable Reader View for All Websites
Most websites include clutter that harms the reading experience, including pop-ups. Safari’s answer to this is Reader View, which allows you to view a clutter-free version of any website.
It removes all the unnecessary details from a web page, including ads, pop-ups, comment sections, and any other unnecessary styling that may not enhance how you view a page, especially when reading. Here’s how to enable Reader View:
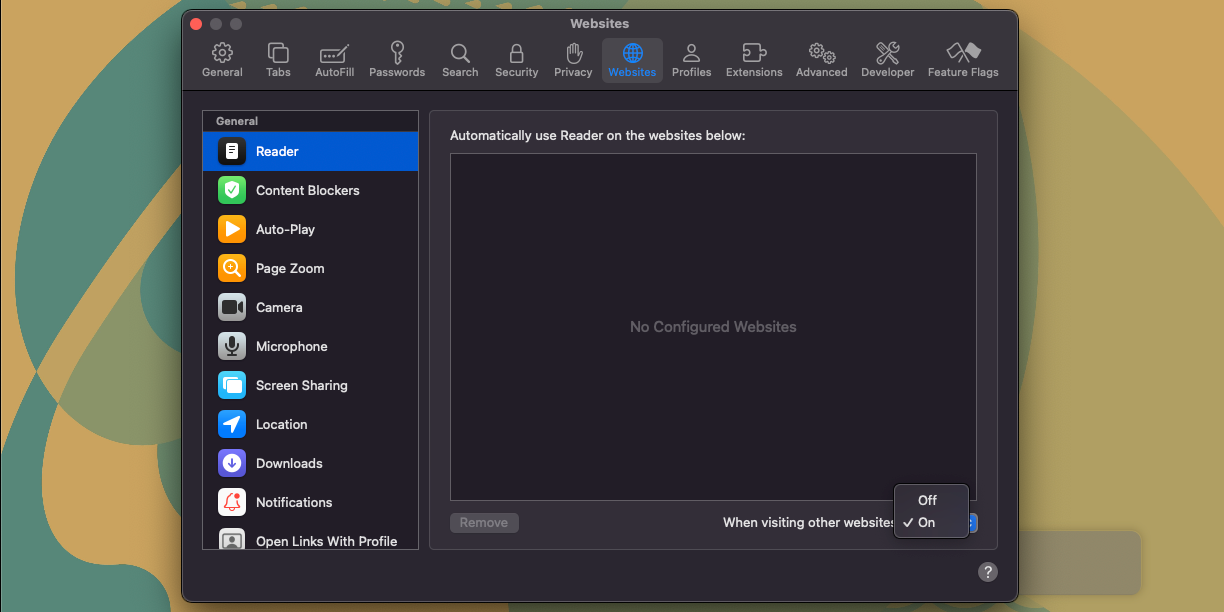
- Click Safari > Settings from the menu bar, then select Websites.
- Select Reader from the left sidebar if it’s not selected yet.
- Click the dropdown box next to When visiting other websites and select On.
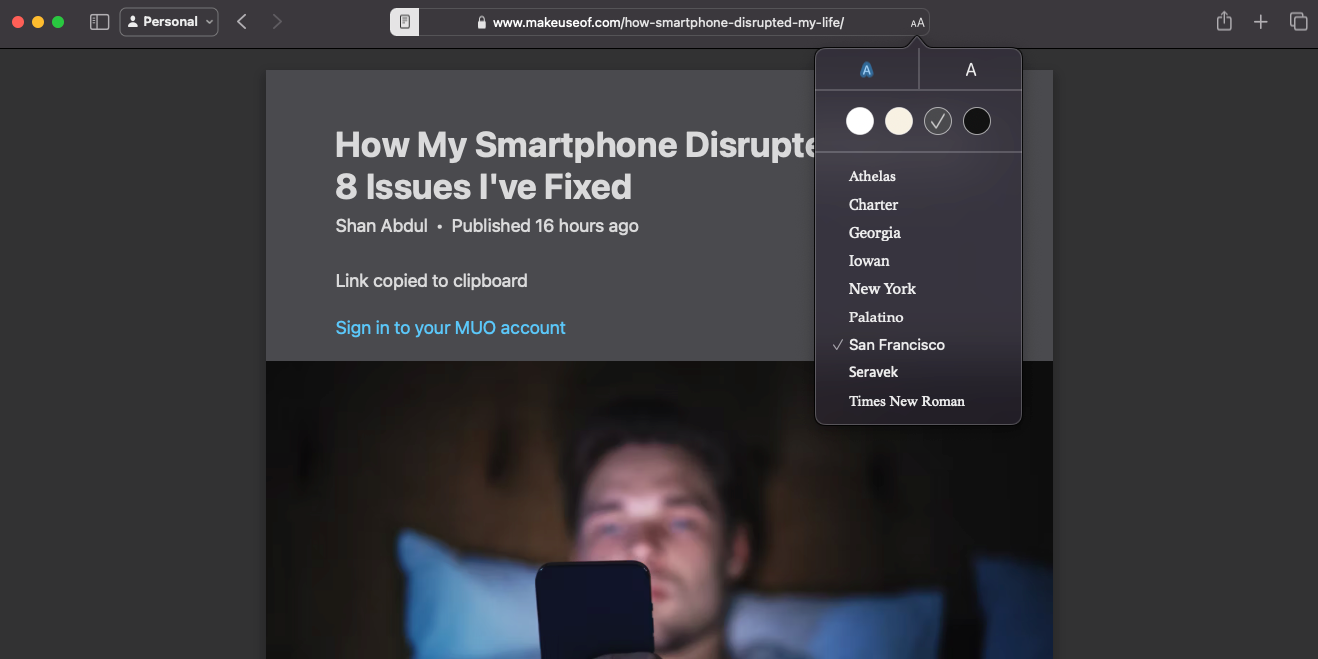
From now on, Safari will display webpages in Reader View whenever possible. For convenience, Safari adds a special icon to the left of the address bar that you can use to disable Reader View anytime.
While viewing a page in Reader View, you can adjust the font family, size, and background color by clicking the aA icon on the right of the address bar.
This feature won’t work on all websites; it doesn’t work on Amazon’s homepage or our website’s homepage, for example. Aside from macOS, you can also use Reader View in Safari on other platforms if you find the feature helpful. Besides using Reader View, there are other tips to improve your Safari experience on your iPhone.
4 Disable Website Notifications
Browser notifications are essential as they ensure you don’t miss out on updates. For instance, getting notifications right from your email provider in the browser can be handy. However, you don’t need notifications from most websites on the internet. Plus, some websites abuse the feature and use it to send ads. I have blocked all websites from sending notifications to combat this in Safari.
Safari allows you to exclude some websites, allowing them to send notifications. However, I prefer to receive updates from my phone rather than inside a browser.
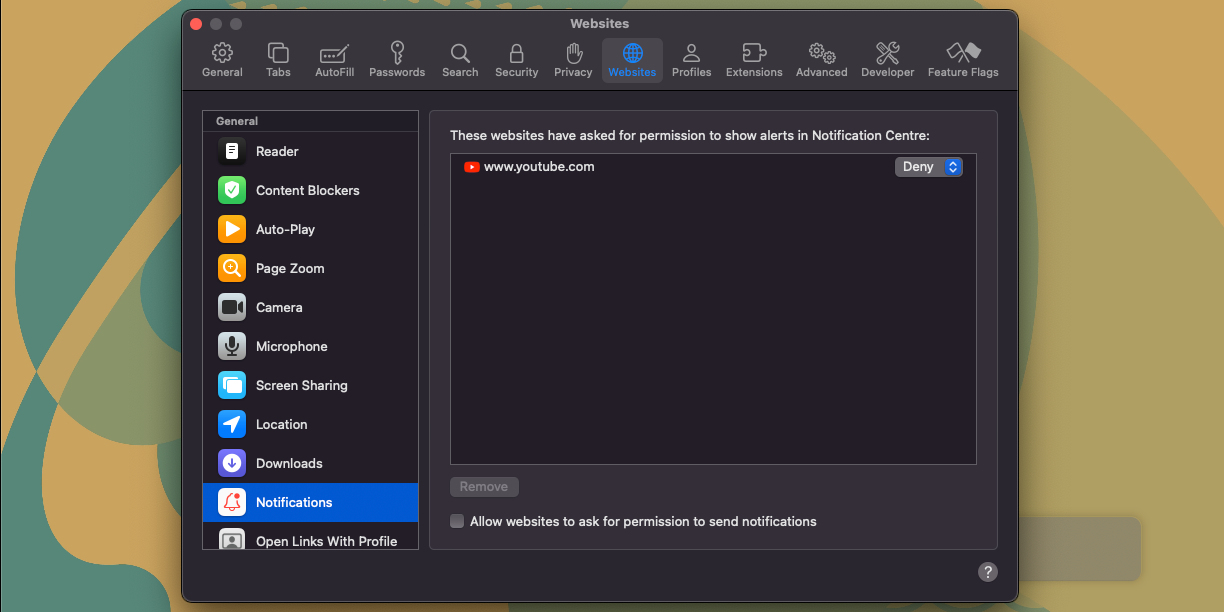
To block all notifications from websites in Safari, follow these steps:
- Click Safari > Settings from the menu bar.
- Head to the Websites tab and select Notifications from the left sidebar.
- Uncheck the box next to Allow websites to ask permission to send notifications.
With this set, no website will be able to send notifications.
5 Enable Safari Profiles
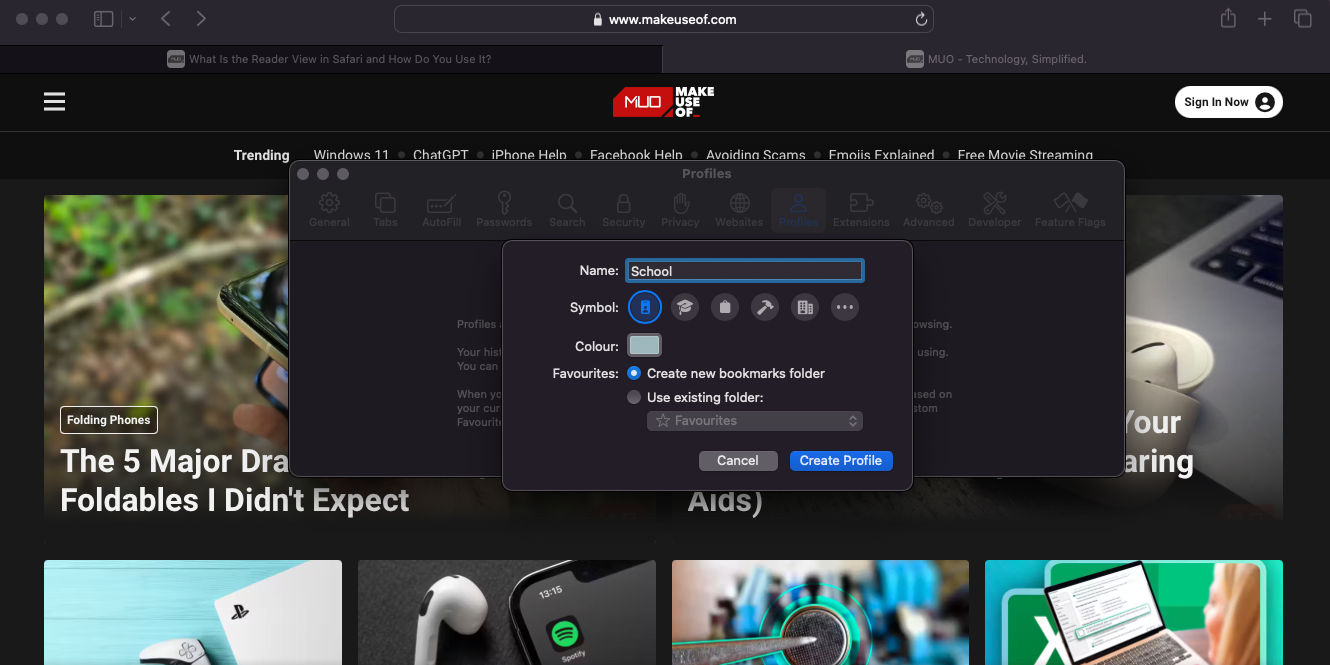
I use Safari for both personal and work use. Since I do more than writing, I prefer separating my work and personal browsing activities. You can do this on Safari by using the built-in profiles feature. You can create a Safari profile by following these steps:
- Click Safari > Settings from the menu bar.
- Select the Profiles tab and select Start Using Profiles to get started.
- Enter the name of the profile and optionally select the appropriate symbol and color.
- Once done, click Create Profile to create a new profile.
You can also create and use profiles in Safari on an iPhone or iPad since the feature isn’t exclusive to the macOS version of the browser. You can create more than two profiles to separate browsing activities if you have more than two things going on.
6 Block Pop-Up Windows
I often encounter annoying pop-ups on websites. They’ve become really common these days and are often used to display ads and alerts. They not only harm the user experience while trying to view a website but can also be a waste of time.
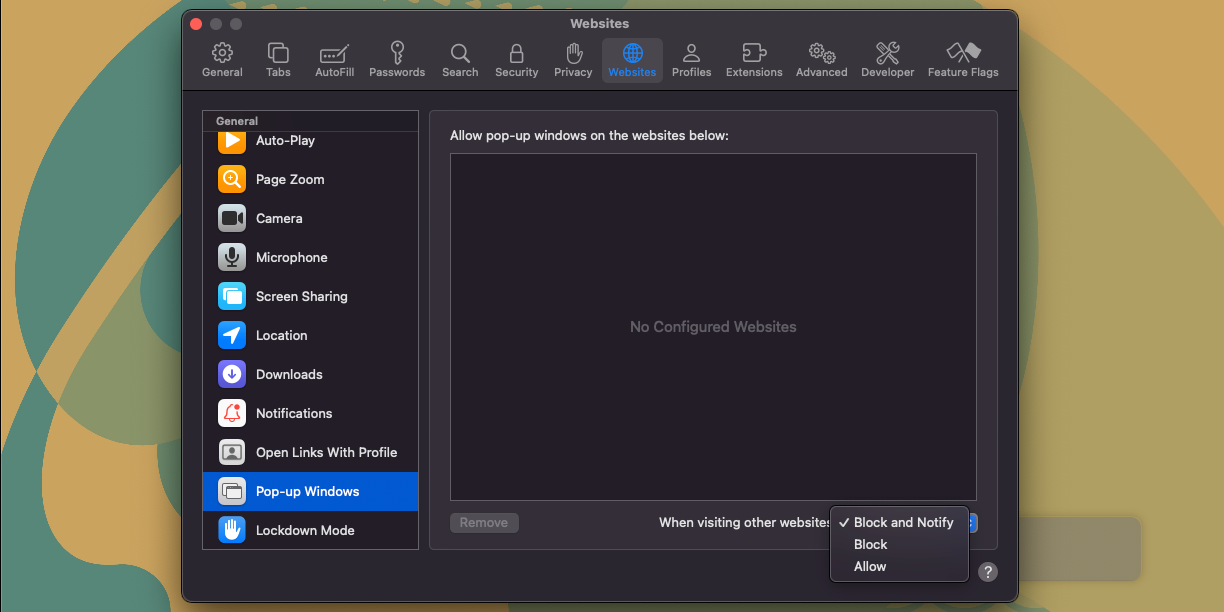
With Safari, I no longer need to worry about this because it provides a way to block these pop-ups by default automatically. You can block all pop-up windows in Safari by following these steps:
- Open Safari and go to Safari > Settings from the menu bar.
- Select Websites from the settings window.
- On the left sidebar, scroll down and click Pop-up Windows.
- Click the option next to When visiting other websites and choose Block or Block and Notify.
Tweaking these settings helped me greatly improve my browsing experience with Safari. I can see my exact location while browsing any website, use Reader View for a clutter-free reading experience (which also helps remove pop-ups), and have several profiles to separate browsing activities.
Additionally, I’ve said goodbye to website notifications and pop-up windows. Some of the features I covered here are available in other browsers, but there are more reasons why I use Safari over other browsers on my Mac.

